
Excalibur, the mini mech part 1.


Hello again! Welcome to another exiting post from Legomaster! In this post I will be showing you how to build an amazing MOC(my own creation), Excalibur, the medieval mini mech! This is a part one of a two part post. The first post (this one) will show you how to build the top torso.

Here is the mech itself, Excalibur!


Here are the pieces to start off with.


Start by taking one 1x2 double stud brick and attach a 1x2 bar plate piece on each side as shown.


On top of each 1x2 bar plate, attach a 1x1 circular clip plate as shown.


On the back of the 1x1 circular clip bar attach a inverted 1x2 slope to the back as shown. 


On the front of the 1x1 circular clip plate and part of the front of the inverted 1x2 slope, attach a 1x2 brick with side studs. That is the brick you started with in the beginning.


On the inner bottom sides of both of the 1x2 brick with side studs, attach a 1x1 plate side clip as shown.


Do the same thing on the outer bottom side, except with light grey. You can however, do this with whatever colors you want, as this is now your creation as it is my own!


On the front of each 1x2 brick with side studs, attach a 1x2 sloped grill piece. The 1x2 sloped grill piece is actually one of my favorite pieces, as it can bring large amounts of detail in its small package. I recommend using it when building with vehicles and sci-fi, but it can be used in any way you want!


Now with both of those clips, attach a T clip bar on each side. This is where the arms will connect.


Now lets move on to the arms themselves. I know the picture is blurry, but you need to connect a grey 1x1 round brick to the front of each light grey 1x1 highlight brick.


Now through the back of the highlight 1x1 brick is a little square that not many builders use as much as they should. Attach a dark grey robot clay inside the brick to the backside of the hollow stud that holds the 1x1 dark grey round brick in. Sounds complicated, but is a really easy step.


Now attach the dark grey 1x1 tube brick to the exposed clip part of the T bar.


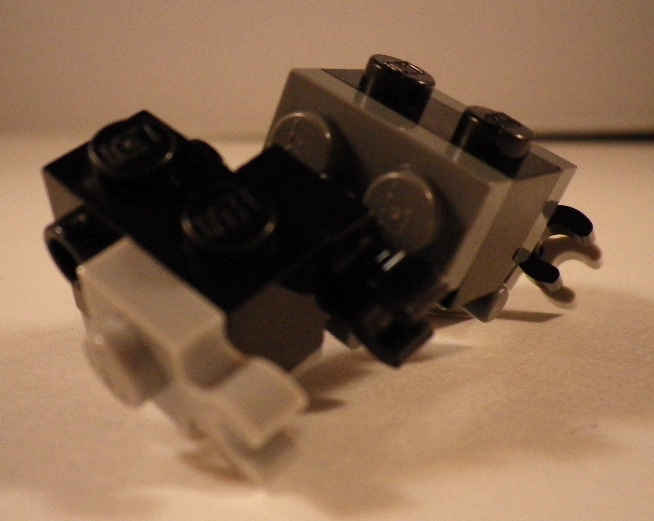
This is a small detail, but attach a light grey 1x1 round stud to the light grey 1x1 flat clip plate on both sides. Above that on both sides attach a dark grey 1x1 cheese slope. The clear parts are just for temporary photo support, don't worry about them. 


Then on the front of the original 1x2 side stud brick, attach any color 1x1 round stud as shown.


And that is all for part 1 of Excalibur. Come back next week for part 2, where we will build his/her legs. Come again soon!

Comments

Popular posts from this blog

Pacific Rim Jaegers, Fan Design!

Hello and welcome to anther post from Legomatic. I know I just posted yesterday, but I had to get these on here, since I soon will(or already have) posted these on Lego Ideas. If you just came here from Lego Ideas, thanks for your support, and please consider following me on Ideas or me in Blogger to see even more cool MOCs. Lets dive it. To start off, here is a shot of all the Jaegers. For those of you who don't know what a Jaeger is, it is a 2 person piloted mech from The movie Pacific Rim and Pacific Rim Uprising.  Lets start off with my first one, Midnight Redeemer. And yes, I did name them all. If you have suggestions for better names, please comment them down below!  As you can see, he has two twin swords, which can easily detach from the clips on the wrists. Here on the back, you can faintly see the jump pack installed. I usually do jump packs in place of jet packs, because I feel that would make the Jaegers too OP. One final ability is t

Steampunk Sentry and AI! Lego Ideas Idea

Hello and welcome to a post from Legomatic, and today we'll be looking at my first attempt at building in Steampunk, a fantastical concept that is extremely fun to build in. If you are from Lego Ideas, please consider supporting my project, it would mean a lot. I imagine the story behind this, is that in the modern world, an old, fanatical AI developed back when steam engines were used in every device has watched the world develop before him. He is insulted by the gleaming, white, seamless devices and wants to bring back what once was. In order to make his dream reality, he has renovated one of his long dead masters projects into something a little more sinister, to exact his vision upon everyone else, whether they like it or not. Here is the machine, The ST33m 550, a walker armed with dual rodburn cannons. It runs off coal(of course), stored in a internal tank, which then heats rods of metal within to white hot temperatures, which are then expelled out the end, bu

War Machine-HULKBUSTER!

Hello and welcome to another epic post from Legomaster. This week I will be showing you a longterm project that I have been working on for over 2 months. I did not build every day, some weeks I did nothing at all, sometimes only one or two small adjustments.  Here I present it to you: The WAR MACHINE HULKBUSTER!!! It's a little over 9 inches tall and 6 inches wide. Now for the functions. Here is the cockpit inside the chest that opens on a small hinge. Here is a arm, which has 3 fingers, a gun, and a quad-piston extenders. Here is a cool fact: The upper part of the arm is a 6 stud shooter and the shoulder protectors are nexo knight shields.  Up here you can see the main gun which has 4 rotating barrels(in my imagination) to mow down enemies. The hulkbuster is powered by not 1, not 2, but 3 arch reactors! How else will you power all those mechanics? The round brick on top is to hold the War Machine helmet once I get a War Machine minifigure.