Starnight - Original Spacecraft

Hello and WELCOME to a new post from Legomatic! Last time we looked at a cutom Slave 1 moc, and today we're showcasing another Moc, The Starnight. If you are coming from Lego Ideas, welcome! If you are coming from Reddit, also welcome! Let's jump right in.

A bit of backstory, I had to take apart my favorite Lego set of all time, set 70595 NINJAGO Ultra Stealth Raider for a school project. Once that happened, I couldn't let it's legacy go to shame. To let it live on, I built the Starnight, a space fighter built in the same style, that's sort of a shadow of the original set.


The Starnight's dimensions are about 7.25"x 5.5" x 2.5" (in studs, about 23 x 17.5 x 8), so it's pretty small.


Inside you can find a spacious cockpit, with enough room to comfortably seat 2 minifigures, 3 if you don't care about comfort.


On either side is a 6 stud shooter, something which the original set also had. I might update some of the details later, to get it to flow better. On to top of each gun section is a strip of caution tape, warning that this is no mere piece of machinery.


Around the back is the engine, and I'm a huge fan of engines that just flow flawlessly into the body, and that's what I tried to accomplish here using two Windscreen 7 x 4 x 2 Round with Handle pieces.


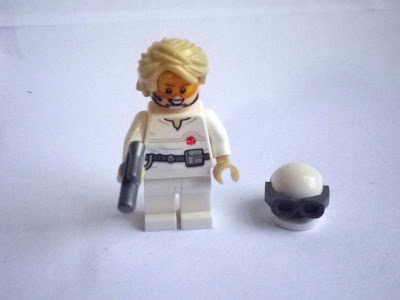
Finally, the pilot, which consists of a Cloud City policeman torso and legs, a rebel pilot head, and a Lloyd hairpiece with a silver plaster as well as a white helmet.

And that's about it. Please consider supporting this project on Lego Ideas, and have a great day!

Comments

Popular posts from this blog

War Machine-HULKBUSTER!

Hello and welcome to another epic post from Legomaster. This week I will be showing you a longterm project that I have been working on for over 2 months. I did not build every day, some weeks I did nothing at all, sometimes only one or two small adjustments.  Here I present it to you: The WAR MACHINE HULKBUSTER!!! It's a little over 9 inches tall and 6 inches wide. Now for the functions. Here is the cockpit inside the chest that opens on a small hinge. Here is a arm, which has 3 fingers, a gun, and a quad-piston extenders. Here is a cool fact: The upper part of the arm is a 6 stud shooter and the shoulder protectors are nexo knight shields.  Up here you can see the main gun which has 4 rotating barrels(in my imagination) to mow down enemies. The hulkbuster is powered by not 1, not 2, but 3 arch reactors! How else will you power all those mechanics? The round brick on top is to hold the War Machine helmet once I get a War Machine minifigure.

Pacific Rim Jaegers, Fan Design!

Hello and welcome to anther post from Legomatic. I know I just posted yesterday, but I had to get these on here, since I soon will(or already have) posted these on Lego Ideas. If you just came here from Lego Ideas, thanks for your support, and please consider following me on Ideas or me in Blogger to see even more cool MOCs. Lets dive it. To start off, here is a shot of all the Jaegers. For those of you who don't know what a Jaeger is, it is a 2 person piloted mech from The movie Pacific Rim and Pacific Rim Uprising.  Lets start off with my first one, Midnight Redeemer. And yes, I did name them all. If you have suggestions for better names, please comment them down below!  As you can see, he has two twin swords, which can easily detach from the clips on the wrists. Here on the back, you can faintly see the jump pack installed. I usually do jump packs in place of jet packs, because I feel that would make the Jaegers too OP. One final ability is t

Excalibur, the mini mech part 1.

Hello again! Welcome to another exiting post from Legomaster! In this post I will be showing you how to build an amazing MOC( my own creation ) , Excalibur, the medieval mini mech! This is a part one of a two part post. The first post (this one) will show you how to build the top torso. Here is the mech itself, Excalibur! Here are the pieces to start off with. Start by taking one 1x2 double stud brick and attach a 1x2 bar plate piece on each side as shown. On top of each 1x2 bar plate, attach a 1x1 circular clip plate as shown. On the back of the 1x1 circular clip bar attach a inverted 1x2 slope to the back as shown.  On the front of the 1x1 circular clip plate and part of the front of the inverted 1x2 slope, attach a 1x2 brick with side studs. That is the brick you started with in the beginning. On the inner bottom sides of both of the 1x2 brick with side studs, attach a 1x1 plate side clip as shown. Do the same thing on the outer bot